Dog Art Blog by Talitha
pastel dog art, my life, my doubts and my dreams
Every now and then I write about dog art, my life, my doubts, my hopes and my dreams.
I'd love to read your comments on my blog!
#8 A hospice for dogs?
Last week my great aunt Mary passed away at the respectable age of 92. She lived a very rich life and lived in her own house, until the last three weeks of her life, which she spend in a hospice.
The dictionairy states 'a hospice is a home providing care for the sick or terminally ill.'
This made me come to the realisation that in a way, our home is currently a hospice too. Some people have a vision of hospices as quiet and gloomy places where the very ill go to spend their final days. This couldn’t be further from the truth. In reality, hospices are full of life and compassion. And it’s not like being in a hospital.
This practically describes our home, apart from the fact that we didn't have to move location ;)
Last Saturday it was exactly 8,5 years ago I got to pick up my girl from the breeder. Amazing how quick these years have passed. Seems like only yesterday I held my (then tiny) girl in my arms and started our adventure together.
When she was only two years old, she was diagnosed with severe Spondylosis - a painful condition of the spine resulting from the degeneration of the intervertebral discs. When diagnosed our vet told me that I would be extremely lucky if she got to life to the age of six. It was like he handed me a grenade with a set timer and my carefree days where over...
As you can probably imagine, we lived live to the max, not knowing when it would end, but kind of knowing the finish line would be crossed on or before January 5th 2016. Little did I know that we are granted loads of bonus time (as I tend to call it)! Yeeeeeyyyy!!!
The last two weeks I have been off work (my regulare fulltime job), so I got to spend most of my time non-stop with my girl. Of course I know that she is getting old, but spending that much consecutive time with her made me realize just how old...
Please don't get me wrong; I feel super blessed that she is still with me and it is completely okay that she is showing signs of old age. But is is pretty confronting to say the least.
She is slowing down, she is losing strength in her hind legs, she has less stamina and she takes more brakes.
But she still wags her tail. She still insists on bringing her tennis ball with her on the afternoon walks, she still digs holes (be it somewhat slower). She still 'corrects' her friend Jansen the Lab when he doesn't listen when being called. She still enjoys her favorite meals and treats. But most important of all...she still has that sparkle in her eyes. So no, it's not her time yet...!
With that being said; I hope we get to enjoy many more days and nights together in our home/hospice. I know I will do what's needed when the sparkle fades. Because that too is how you show your dog you truly love and appreciate them...

#7 Will you be there 'til the end?
I while back I read a tweet from someone who asked their vet what the hardest part of their job is. The answer she got was 'when I have to put an animal down, 90% of owners don't actually want to be in the room when I inject them, so the animals last moments are usually them frantically looking around for their owners'....
As you can probably imagine, this answer broke me, like it did the girl who tweeted it and many people more; the tweet went viral and has been retweeted almost 50.000 times.
I myself am the proud mom of my girl, Great Dane Noa, who is now little over 8,5 years old. I think it goes without saying that I'm dreading the day she will leave me, but I do know 1000% sure I will be right by her side if it is up to me.
If I have to have her euthanized, it will be done in our own home, right there where we made millions of memories. When her time comes I will be cradling my girl in my lap, while whispering soothing words in her ear, regardless of how distraught I am... My girl deserves nothing less than my presence, especially then! Through thick and thin...
Curious to learn your thoughts on this; will you stay with him/her when the time comes?
#6 What materials do I use?

I often get asked what medium I use for my drawings, so I thought it would be a good idea to tell you all about that. Plus all the other materials I use to create a portrait.
Paper
I'll start of with the paper.
I use a medium that requires a paper with a fine tooth, to adhere the medium.
After trying out at least 10 different brands and types of paper, Clairefontaine Dessin à Grain paper came out a winner for me; this paper is bright white, acid-free, lightfast, age-resistant, 180gms and it has a beautiful matt finish. All important qualities that I was looking for in a paper.
Medium
The medium I use to create my dog portraits is PanPastel; a soft pastel packed in a unique pan format (cake-like).
PanPastels are available in a large range of colors, but all my portraits are made using solely the black 800.5
PanPastels are made using a unique manufacturing process requiring minimal binder and fillers, resulting in rich, ultra soft and super-blendable colors.
They are loaded with the finest quality artists’ pigments for the most concentrated pastel possible. They have excellent lightfastness and are fully erasable.
Applicators
Since the PanPastel is in a pan, I need tools to get it on paper.
For this I use the specially designed Sofft Art Sponges, which are made with a semi-absorbent micropore sponge material. Each sponge has a unique shape and size. My go-to sponges are the 'sponge bar - round', the 'sponge bar - point' and the 'mini applicator'.
I use the sponge bars mainly to apply and block in the PanPastel and the mini applicator to soften hard edges, to get the PanPastel in hard to reach areas and to create minitiature detailing, like the iris in the eye.
Erasers
I couldn't create my dog portraits without the usage of at least three different types of erasers; a kneadable eraser, a pen-like eraser and a sharp edged eraser.
My favorite kneadable eraser is the Royal Talens Kneadable Eraser. Like the name of the eraser already reveals, the eraser can be kneaded into any shape or form I need. This specific brand can be used so many times until it is saturated, I love it!
The pen-like eraser I am hooked on is the Tombow Mono Zero; a refillable eraser pen with a fine point for very precise and neat erasing. It has a push mechanism with metal lead, is refillable and latex free. It is available
with two differently formed tips: a round tip in 2.3 mm diameter and rectangular tip in 2.5 x 5 mm. I own both but tend to always grab for the rounded tip.
My go-to sharp edged eraser is the Faber Castell Mini Sleeve Eraser; an PVC-free, ergonomically shaped quality eraser for both sharp and soft corrections with a protective sleeve to keep my fingers clean. I mainly use this eraser to create the whiskers and to clean the sticky tape marks when the portrait is finished.
Any other materials
A sheet of very fine sandpaper to sharpen my erasers.
A silk-like two-fingered glove to make sure I don't create finger-/palm prints with my drawing hand whilst leaning on the paper.
A Derwent Fan Brush to remove access material from the erasers from the portrait.
A Derwent Rubber Point to create fine lines, where I don't want to completely remove the PanPastel color, but want a subtle color difference.


#5 When do you quit your day job?

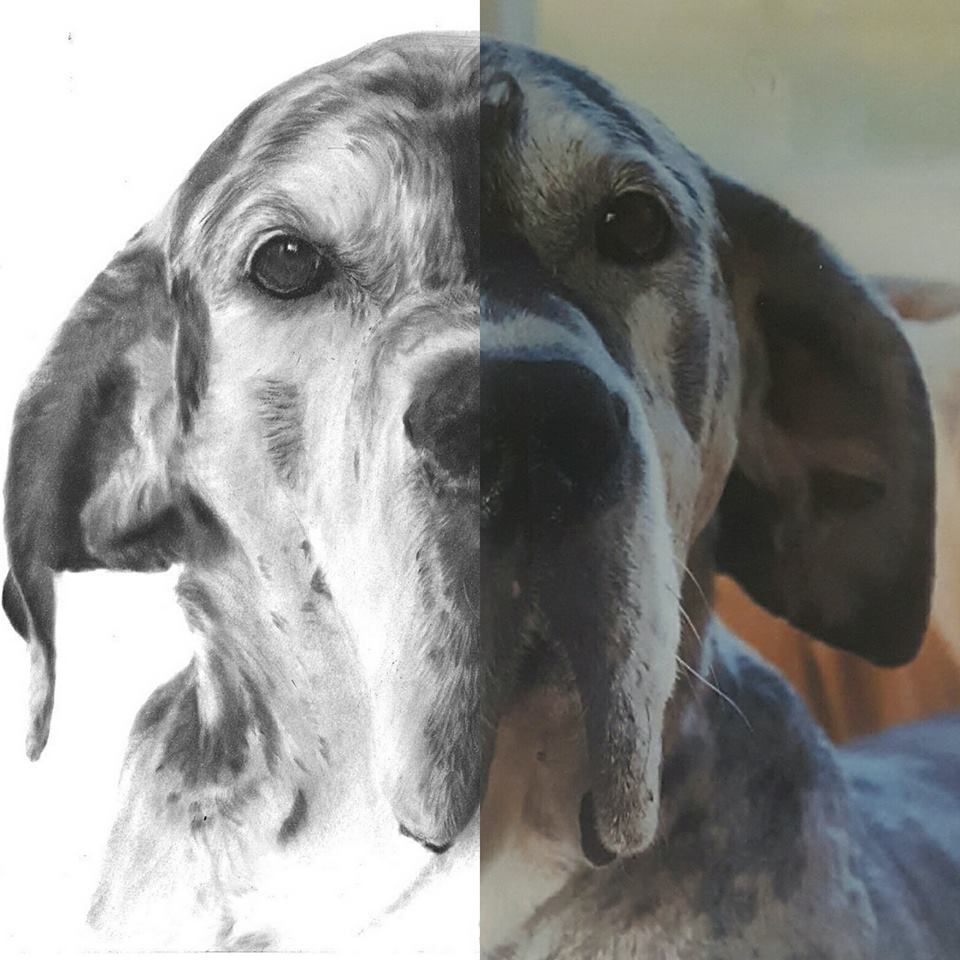
I often get great compliments on my dog portraits; ' they are so realistic', 'I've never seen anything like this', 'I thought it was a picture!'.
Compliments like these always make me lost for words...somehow I can seem to comprehend that my own two hands actually practice the art of drawing. Especially since I never considered myself to be a socalled creative person.
When I tell people I struggle to find the time to draw because of my day job (I work fulltime as an office manager at an internet agency), they always react kind of surprised. Surprised that I still work a day job and can't manage to support myself with my art.
The problem is that there is always an uncertain factor when your income depends on commissions; one month you may receive 10 commissions, but who's to say what the next month will bring. I do know it will bring a stack of bills that need payment. Whether I managed to receive commissions or not...
Some days I think it would be easier to take the leap of faith if I would have a partner I lived with. Double income. Less financial risk. But then again I probably wouldn't be able to draw 8 hours a day, since I wouldn't be able to focus on my drawing when the bed isn't made, the dishes aren't washed and the room isn't vacuumed. And that does seem to come with the package. Oh, the struggle!
I currently live by myself. Well, that's not quite true. I live together with my Great Dane Noa, my muse. So no, not by myself, but with the best roommate a person could wish for! That also means I don't just have myself to take care of. She depends on me. She depends on me for walks, food, her medicine and lots of love. And of course she gets all of that. But that also means that working less hours with my boss, or quitting my day job all together, could have concequences for her. No, not the love and walks part, but she does have quite a gourmet taste and her meds are not the cheapest either.
Another part of the struggle is that bringing down the hours as an Office Manager would mean, besides spending more hours at the drawing board, spending more time with my girl. A typical win-win wouldn't you think? But on the other hand it would mean I HAVE to get enough commissions to fill the 'gap' in order to maintain our living standards. And that's a certainty I don't have. Damn, why are some things so complicated sometimes... Or do you think I just see bumps in the road?
At this point I think I will postpone the difficult decision to quit my day job until further notice. But the the fact that thoughts like these circle my brain tell me that I am almost ready to become an actual entrepeneur ;-)
#4 How to take the perfect picture of your dog
All my dog portaits are drawn from pictures. Good quality pictures that is. Since I pay a lot of attention to detail in my drawings, these details need to be visible in the picture.
From time to time I get a bad quality picture send by someone, with the request to draw that picture. Unfortunately I am unable to draw from poor quality pictures...
We all know how hard it can be to take a pic of our pups;
- They never want to look at the camera or the phone, it’s as if they think it will steal their souls!
- Flashes look horrible...
- Natural lighting can be so dark that you can’t tell where your dog ends and the sofa begins!
It’s so hard to capture their unimaginable adorableness and beauty with a camera or phone, but here are some tips on how it can be done (without having to hire a professional photographer or buying a complicated expensive camera):
1 - use natural light
If possible always use natural light when taking a picture of your dog. Avoid flash, as flash burst can not only cause red-eyes, but also frighten your pup. Instead try to go outside or, if that's not an option, use a room that's well lit by a large window.
2 - Keep the eyes sharp
As the eyes are known as 'the windows to the soul', having sharp eyes in the picture is super important. Make sure to focus on your dogs eyes and keep the tack sharp. Maybe even consider holding his or her favorite toy right above the lens of your camera or phone, to make sure your dog will focus on that. That way you can buy yourself some time to click for the perfect pic!
3 - Get up close and personal
It is very important that you dog feels comfortable and at ease, so instead of forcing him or her to come to you go to them. Most important is to get down to their level; We all know how a dog looks when viewed from above, this is the way we always see them. Show us the way they see world! Sit on the floor or lie on your belly and remember to shoot from HIS or HER eye level or maybe even below.
4 - Give value to their character
I think it's safe to say that your dog will be totally him- or herself when you are the one behind the camera. Therefor chances are that they will show their true character. In my opinion a successful picture is one that reflects your dog a they truly are. We are all familiar with the 'sqeeky toy' pics, where your dog looks super alert with his or her eyes wide open. If you want to photograph your dog with 'softer eyes' and a more relaxed appearance, stay away from objects to lure their attention.
5 - Stay away from the zoom button
In order to end up with a high quality picture of your dog, make sure to leave the 'zoom' function on your camera or phone alone. If you do zoom in when taking a picture, that usually results in loss of quality where the enlarged image looks blurry and unprofessional.
6 - Be patient
Dog photography requires a lot of patience. A LOT! No matter how excited your pup is, if you are patient enough, he or she will end up relaxing and you will have the opportunity to get a decent shot. When you lay down on the floor for example, they might think you are initiating a new sort of game and be 'in your face'. But once they notice that you are not instigating a game, they eventually leave you be and give you the chance to take some great pictures.
7 - Experiment
Try different approaches, angles and compositions. Don't expect to have the perfect picture taken in the first try. It might take you several sessions before you get that perfect picture. Shoot a lot; you will have time to worry about the results later.
8 - Have fun!
No matter what you try to get the perfect picture of your dog, make sure you and your dog have fun doing it!
You have a tip that I forgot to mention? Make sure to share it by adding it in the comments :-)
#3 PanPastel, my all time favorite medium..
In my previous post I mentioned my switch from charcoal to PanPastel and I thought I'd write some more on this fantastic medium that is, for reasons unknown to me, relatively unknown in the artist world.
PanPastel is a member of the soft pastel family. On their website www.panpastel.com it states; 'PanPastel Colors are professional artists’ quality soft pastel colors packed in a unique pan format (cake-like). The special qualities of PanPastel Colors mean that artists can blend and apply dry color like fluid paint for the first time.'
Since I only use black for my dog portraits, you might wonder why I'm such a PanPastel enthusiast. Well, let me try and explain to you why that is. As you might know soft pastel is known for its rich colors and versatility. Since I was looking for a medium that could give me a rich black color, the switch to soft pastel wasn't all that surprising. But why not switch to traditional soft pastel sticks or pencils you wonder?
I wanted to use a medium that I could do the full portraits with. I didn't want to do mixed media. Using only soft pastel sticks would have meant I'd had to combine them with soft pastel pencils for the finer details, since I couldn't see myself creating super fine lines with a stick. Using only soft pastel pencils would have meant I couldn't create the softness that soft pastel sticks can create. Then the store clerk pointed PanPastel out...
As the name already states, PanPastel comes in small pan's. It's appearance may remind you of things you'll normally find in a make-up bag, like blusher or eye-shadow. To apply PanPastel I was recommended to use the specially designed Sofft tools and applicators; sponge tools that come in various sizes and shapes. Achieving tight detail takes a lot of practice, but as my dog portraits show, it can be done!
Furthermore PanPastel creates far less dust than charcoal or traditional soft pastel sticks. An added bonus for me, since my whole living room was sometimes covered in grayish powdery dust after a drawing session with charcoal...
Most soft pastel artists still choose to use sticks and pencils over PanPastel, but I take great pride in the fact that I have 'mastered the art of PanPastel'!
#2 Something's missing..
After several months of practicing drawing with charcoal, I noticed that there was something missing in my drawings. The charcoal just didn't do what I wanted it to do; I wanted black to really be intense black and the charcoal left me with a darkish grey. Besides that I wanted the dogs to look soft and shiny and charcoal gave them a somewhat coarse finish, Hmmm, what to do...
I decided to pay another visit to the art store and present the store clerk with my problem. They suggested I'd give PanPastel a try. A totally different medium, in no way comparable with charcoal, but since I was only just beginning to experience I decided to give it a try. Of course that meant buying way more stuff than I planned on (special drawing sponges, several erasers, special paper) and so I left the store with an empty wallet, but with a bag filled with new art supplies. Now I know why it's called 'paying a visit'!
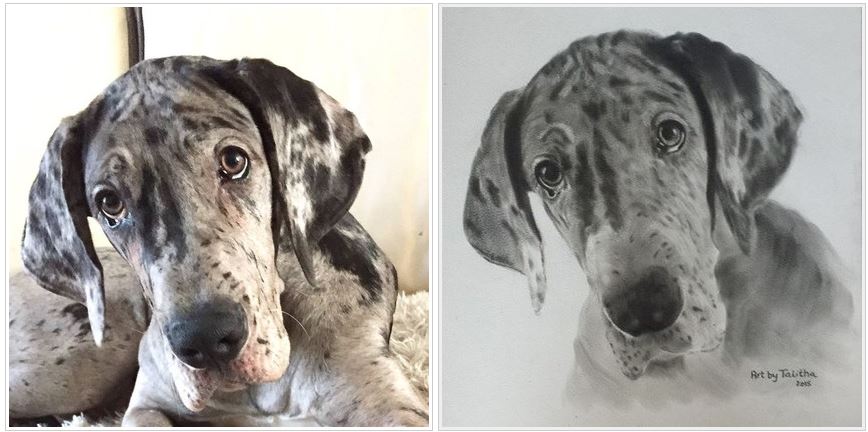
Once I got home I immediately unpacked my new supplies and started on my first ever PanPastel drawing. I must say it was quite a challenge to do the full portrait in PanPastel, since the medium is most frequently used to fill out large sections only and not to do small detailed work. I had to be inventive, but managed to create my own tools to get the detailing done. The result was exactly what I hoped it would be; a smooth, soft looking Great Dane puppy!
#1 How it all started..
Never in my wildest dreams could I have thought that one day I would be writing a blog, let alone a blog on dog art..
I understand that might need some explaining, so that is what this first post will be about; how my passion started.
I only started drawing two years ago. Two years and four months ago to be exact. On March 17th 2014 I attempted my first ever drawing in charcoal: a drawing of (who else..) my very own Noa.
The vet had just informed me that Noa's back problems would only worsen if we kept the active live we were leading, so no more day-long walks in the forest or on the beach, no more tracking trails, but an enormous amount of free time on my hands, since Noa would benefit most from resting..
Not wanting to become a couch potato, I thought of all the things I always wished I could do, but never dared trying. And then 'drawing Noa' popped into my head; mind you, I hadn't drawn anything since elementary school...about 25 years ago...and I wasn't a talent back then either..
A visit to the local art store it was! I must say, I felt nowhere near an artist in that store, since I had no idea what I was doing and what I needed to execute my oh so creative idea. But the store clerk was kind enough to help me out and help me decide on which medium to try out. After paying, of course, I walked out the store with a bag containing an A3 sized sketching pad from Clairfontaine, some Willow charcoal, a Talens kneaded eraser and a blending stump.
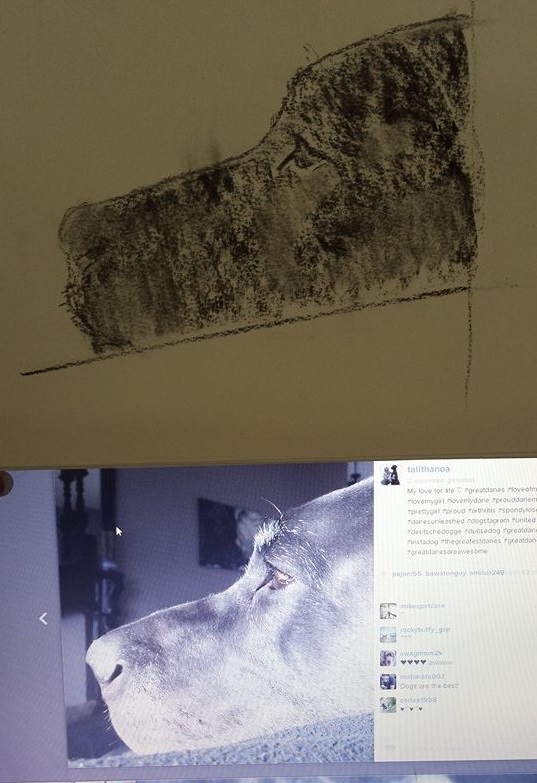
I sat down at my desk with one of my favorite pictures of my dog and started scratching the charcoal on the paper; harsh and without any feeling. The result...let's just say it resembled anything bút my dog... I couldn't feel less than an artist at that moment...
Not willing to give up, I thought I'd better get to know the materials first, so I started drawing lines. Just simple straight lines. First with the sharp end and the with the side end of the charcoal. Then curves, using the same technique. Then I tried using the blending stump and the kneaded eraser. And that all taught me that it takes a gentle touch, a super high dosage of patience and much consideration to get on paper what your eyes see.
After practicing on about 5 sheets of paper, I made another attempt at drawing Noa...and though it left a lot of room for improvement; this drawing still brings a smile to my face, since it represents the birth of my drawing passion!